
Father’s Day Sugar Cookies — a Necktie Decorating Guide

A necktie cookie only reads as a necktie if the knot end is wider than the tail and the edges stay crisp after baking.
That’s the detail that trips up most first attempts at these — the dough spreads slightly in the oven, and a tie shape with thin points turns into a blob before the icing ever touches it. The fix starts with the cutter and the chill time, long before royal icing enters the picture.
This batch makes twenty cookies split across three shapes: necktie, wrench, and a simple grill silhouette, all finished in a navy-and-charcoal palette that reads as “dad” without leaning on a specific team color or cartoon character.
The dough is a standard rolled sugar cookie, sturdy enough to hold a shape and forgiving enough for a first-time decorator to practice fine-line piping on.
Ingredients You’ll Need
The base dough uses 2.75 cups of all-purpose flour, 1 cup of softened butter, 1 cup of sugar, one egg, a teaspoon of vanilla extract, and half a teaspoon of baking powder.
Keep the butter at true room temperature — cool enough to hold a fingerprint but not so soft it’s greasy — because that’s what keeps the dough from turning oily once the sugar is worked in.
For icing, four cups of powdered sugar and five tablespoons of meringue powder form the base, thinned with water to two distinct consistencies: a stiffer outline consistency and a looser flood consistency that self-levels in about ten seconds when you drag a knife through it.

Split the batch and tint with navy and charcoal gel food coloring — gel rather than liquid, since liquid coloring waters down the icing enough to throw off both consistencies. Keep a small amount of white icing aside undyed for the fine-line piping on the tie stripes.
Getting Clean Necktie and Tool Shapes
Roll the dough to a quarter-inch thickness between two sheets of parchment, then chill the rolled slab flat for at least thirty minutes before cutting. Cutting cold dough is what keeps a necktie’s narrow tail from stretching or tearing as the cutter presses through it — warm dough drags at the edges instead of shearing cleanly.
After cutting, transfer the shapes to the baking sheet and chill them again for ten minutes before they go in the oven. This second chill matters more for the wrench shape than the tie, since the narrow gap in a wrench head is the first place spreading shows up.
Bake at 350°F for nine minutes, pulling the sheet as soon as the edges look set but before any browning starts at the tips — a wrench that’s baked a minute too long loses its jaw opening entirely.
Let the cookies cool completely on the sheet for a few minutes before moving them to a rack. A warm cookie will flex under a spatula, and a flexed necktie shape cracks right at the knot.
Piping Fine Lines and Details
Flood each cookie in its base color first — navy for most of the tie, charcoal for the wrench body — and let that base coat sit for about twenty minutes until a light skin forms on top. Piping straight onto wet icing makes every detail line bleed sideways into the background color, so this waiting step isn’t optional.
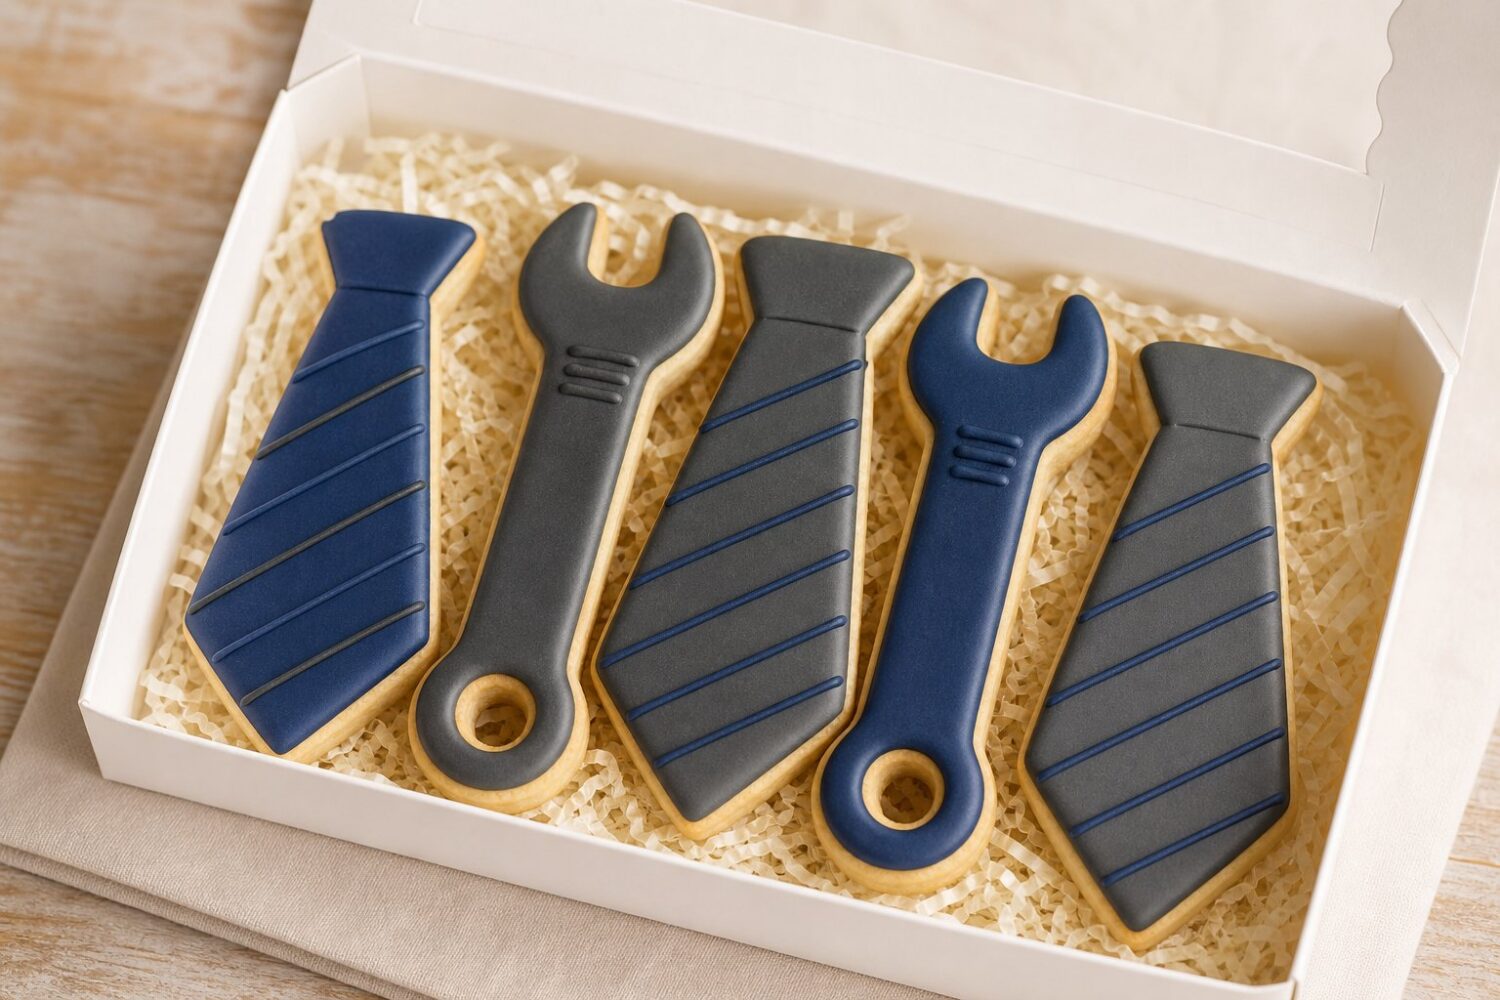
Once the base has set, fit a piping bag with a small round tip, size 1 or 2, filled with the reserved white icing. For a tie, pipe diagonal stripes running the same direction across the whole shape, spaced about a third of an inch apart — consistent spacing reads as a pattern, while uneven gaps just look sloppy.
Work from the wide knot end down to the narrow tail in one continuous motion per stripe rather than stopping partway, since a restart leaves a visible bump.
For the wrench, pipe a thin highlight line along one edge of the tool to suggest a metallic sheen, plus a small darker shadow line along the opposite edge using the charcoal icing at outline consistency.
On the grill shape, horizontal charcoal lines across a lighter gray flood suggest the grate, spaced slightly wider than the tie stripes since the shape itself is larger.
Let every piped detail dry completely, at least six hours and ideally overnight, before stacking cookies or packing them into a box — stacked wet icing smears against whatever is under it.
Frequently Asked Questions
Why did my necktie cookies lose their shape while baking?
Warm dough is the usual cause. Chill the rolled-out dough before cutting and chill the cut shapes again briefly before baking — both steps keep the narrow tail and pointed knot from spreading in the oven.
Can I skip the meringue powder in the icing?
Meringue powder is what lets the icing dry to a hard, stackable finish rather than staying tacky. Without it, the base flood coat won’t set firmly enough to support piped detail lines on top.
How far in advance can these be made?
Baked and fully iced cookies keep well at room temperature in an airtight container for about a week, so they can be decorated several days before Father’s Day and still look and taste fresh.
What tip size works best for the stripe detailing?
A size 1 or 2 round tip gives a fine enough line for tie stripes and tool highlights without the icing spreading before it sets. Anything larger tends to blur the pattern together.
Recipe Card
Nutrition values are good-faith estimates and vary with the exact brands and quantities you use.
Ingredients
- 2.75 cups all-purpose flour
- 1 cup butter, softened
- 1 cup sugar
- 1 egg
- 1 tsp vanilla extract
- 1/2 tsp baking powder
- 4 cups powdered sugar (for icing)
- 5 tbsp meringue powder
- Navy and charcoal gel food coloring
Instructions
- Cream the butter and sugar, then beat in the egg and vanilla extract.
- Mix in the flour and baking powder until a soft dough forms. Chill for at least 1 hour.
- Preheat the oven to 350°F (175°C). Roll out the dough and cut into necktie, wrench, and grill shapes.
- Bake for 9 minutes, until the edges are just set. Cool completely before icing.
- Mix the powdered sugar and meringue powder with water to make a flood-consistency icing, tinting portions navy and charcoal.
- Outline and flood each cookie in its base color, then let the base coat set for about 20 minutes before piping fine diagonal stripes on the ties and metallic-look highlights on the tools.
- Let the icing dry fully, at least 6 hours, before stacking or storing.